Bridge Design
Project Constraints
There are major technical categories for the scale model steel bridge: analysis, design, fabrication, and construction. Each topic will be briefly discussed in this document. A more detailed description can be found in the Student Steel Bridge Competition 2013 Rules located at: http://www.aisc.org/WorkArea/showcontent.aspx?id=21576
Analysis must be conducted on materials, connections, and structure. The AISC Steel Construction Manual 13e will be used during the analysis. AISC has set the standard for steel construction for 91 years. Load and Factored Resistance Design (LRFD) will be used to determine load cases for the bridge. Factors for dead and live loads will be 1.2 and 1.6 respectively. Dead load will be the weight of the bridge and live loads will be the weight placed on the bridge during competition. The results from the analysis will influence design choices. Material analysis will determine member sizing based upon a load and moment envelope determined for the possible loading configurations from the rules. Connection analysis will be done to find connections that will decrease construction time during the competition. Structural analysis will be done to minimize deflections vertically and laterally.
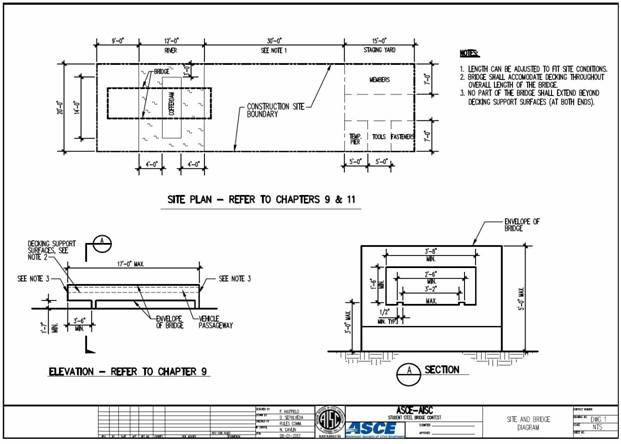
Design of the bridge is limited by member size, height, and length restraints provided in the rules. The back span must be supported at both ends and must completely span the river without touching it. The other end must be a cantilever, and must be located farthest from the staging yard. Individual members are limited to 3' 0" x 6" x 4" in size. All connections where members meet require a fastener at the end of construction time. The bridge must have a vertical clearance of at least 1' 7". The top of the bridge cannot extend vertically more than 5' 0" from the surface of the river. Bridge length is limited to 17' 0". Also, there must be space allowed for a vehicle passageway. Design will be limited by these constraints and will have to be optimized to minimize deflections and construction time during test loadings. Figure 1 below shows basic dimensional requirements for the bridge.
Figure 1. Basic Dimensional Requirements
The figure above shows the envelope of bridge dimension allowable for this years’ competition. It shows the bridge from side and end views with dimensions labeled for each view. Also, dimensions of the construction site are also included in the figure.
The bridge must be constructed with structural steel. Steel is defined for this competition as an iron alloy that is strongly attracted to a magnet. Solder, brazing, and adhesives are not permitted, but items for decorative purposes only are permitted including coatings and decals. Bolts must be commercially available and not mechanically modified or altered in any way. Grade and diameter of bolts is not restricted, but custom fabricated bolts are prohibited.
Construction of the bridge starts with all of the tools, materials and equipment located in the staging yard in designated areas. Builders of the bridge are undergraduate or graduate student members of the competing student organization. One temporary pier is allowed during construction and must be located on the cofferdam. There is a maximum of six builders allowed in the construction area. Builders must wear a hardhat and protective eyewear that meets ANSI American National Standards Institute (ANSI) standards Z89.1 and Z87.1 respectively.
Design Alternatives
Triangular Spline Bridge
The first bridge design was a triangular truss design. Figure 2 below shows a sketch of the design.
Figure 1: Diagram of Spline Bridge
Figure 1 above shows the side and end views for our proposed spline bridge. The design is a series of triangles connected to a central spline that spans the length of the bridge. The trusses and spine are located above the deck of the bridge. The bridge will be laterally supported by the triangular sections connecting to the spline across the bridge.
Underslung Pratt
The second bridge design was an Underslung Pratt truss bridge. An underslung bridge is a bridge that has the supporting trusses below the road surface of the bridge. A Pratt Truss is effective because it has longer diagonal members in tension and shorter vertical members in compression. Figure 2 below depicts the side and end view of our proposed Underslung Pratt Bridge.
Figure 2: Diagram of Underslung Pratt Bridge
The figure above shows the design of proposed Underslung Pratt Bridge design in consideration. Because of the underslung design, length of the supports had to be increased to keep the truss above the minimum height requirements for the competition. In this depiction there is no lateral reinforcement shown. Lateral reinforcement would span across the bridge to increase stiffness against lateral deflection.
Overslung Howe
The third truss design type was an Overslung Howe truss. Howe trusses are similar to Pratt trusses except the diagonals go the opposite direction. Overslung bridges have the truss supported from by the support surface on the bottom of the structure. Original designs for Howe trusses have crossing diagonals, but newer versions remove redundant diagonals to lower material cost and weight. The longer diagonals in the Howe truss carry compression forces and shorter vertical members carry tension forces to the bottom chord. Figure 3 below shows a diagram of our proposed Howe truss design.
Figure 3: Diagram of Overslung Howe Bridge
Figure 3 above shows side and end views for our proposed Howe Truss design. Since the truss structure is on top of the lower chord, support legs are shorter to ensure the top chord of the truss is within the required height limits for the model bridge.
Beam Truss
The fourth truss design was a beam truss. A beam truss is a beam made from trusses. The top and bottom chords of are supported by diagonals in compression and tension only. A beam truss is an efficient use of materials and reserves the same qualities as a beam. The beam will be fairly narrow, so the supports will be long enough to fit the bridge within height restrictions for the competition. Figure 4 below shows the beam truss bridge from side and end views.
Figure 4: Diagram of Beam Truss Bridge
Figure 4 above shows our beam bridge design concept. The area of the truss becomes significantly smaller compared to that of the other bridges. There is one vertical bracing at the cantilever support to reduce deflections where the support is attached to the bridge. This depiction does not show any lateral reinforcement to stiffen the bridge to lateral deflections.
Final Design Details
Our final design for the beam bridge will have a total length of 16' 5/8". It will have a nominal depth of 10 9/16". Chords will be constructed out of 1.25" x 1.25" x 0.125" square HSS, and the diagonals will be constructed out of #3 A706 weldable rebar. Figure 19 below depicts a left side view of the bridge.
Figure 1: CAD Drawing of Left Side View of Bridge
Figure 1 above shows a left side view of our final bridge design. It involves four 36 inch chord members connected followed by an 18 inch member over the cantilever support and a final 36 inch truss member for the cantilever. The trusses will be connected by gusset plates in the center of the bridge. The left support will extend to the top of chord of the bridge and the right support will only extend to the bottom chord. Figure 2 below shows and end view of the bridge.
Figure 2: CAD Drawing of End of Bridge
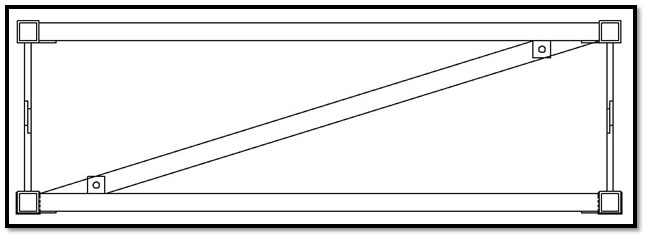
Figure 2 above shows how the lateral bracing will be implemented onto the bridge. It will consist of 2 horizontal HSS pieces, with a diagonal piece of flat bar that helps to prevent translation and rotation when the lateral force is applied. The bridge will measure 34 ¾" from the outer edges of the chords.


